What’s inside an mxrus file?
The .mxrus format is a .zip renamed and comprises of AssetBundles and some metadata files. You can use 7zip or a similar tool to extract an mxrus file and see what’s inside. The scene is exported as a collection of three AssetBundles:assets(assets used in your scene)scene(scene hiararchy)*.unitygenerated(Unity generated metadata, name is same as the mxrus file you’re exporting)
build_report.txt(A prettified BuildReport of the AssetBundle exports)mxr_env_preview.jpg(A preview of the environment seen from the user starting position and direction)
Reducing mxrus file size
The ManageXR Web Console has limits on the size of the mxrus file you can upload. This makes export size optimization necessary. When you finish exporting an mxrus file, a build report is shown which lists the files that have been packaged in the export, along with their uncompressed size. Usually, textures contribute the most to the export size and is also easy to reduce. Eliminate textures you don’t needA material may be using several maps for example base/albedo, normal, height, metallic, normal and illumination. You can often remove most of them without significant loss in visual quality. For example, in the official ‘ManageXR Bungalow’ environment, almost all the models use just a base/albedo map. Additional maps are used for only very specific objects. Reduce the texture resolution
Sometimes textures are imported at very high resolutions. When using models from a 3rd party assets, it’s not uncommon for them to be imported at 2048x2048 pixels by default. Depending on how central an object is to your environment or how close it is to the users location, you can often reduce it to as less as 256x256 without being noticeable. Fix NPOT textures
Textures with “non power of two” width or height cannot be compressed effectively. Resizing your texture files to the closest 2^n resolution will allow Unity to significantly reduce their size. The Unity inspector provides a dropdown under
Advanced/Non-Power of 2 that allows you to change the import resolution without making the changes to the original image file.

| Original | Fixed |
|---|---|
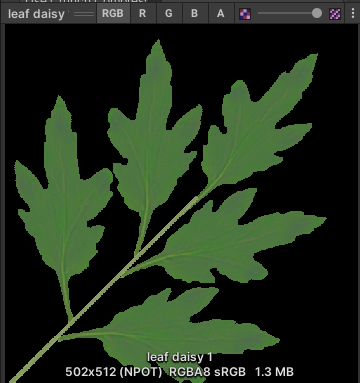 | 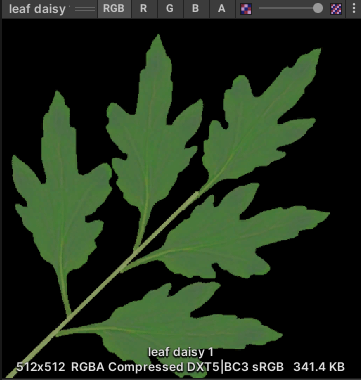 |
Often times a 3rd party asset uses a custom shader. Consider for example that has the following texture map slots:
- albedo
- normal
- alpha
- waterMask
Universal Render Pipeline/Lit, you might see the inspector correctly showing
albedo and normal in the new Lit shader slots and alpha and waterMask not longer listed.
However, when you export your environment, you may still see the alpha and waterMask textures listed in the build report. The reason is that
the material is still referencing the old texture files, those texture slots are just not serialized, so you can’t see them in the inspector.
To solve this, change your inspector to Debug mode by pressing the ellipses button on the top right of the inspector panel and change from Normal to Debug

Saved Properties/Tex Envs. Expand all entries and find
any references to a texture you don’t need.

Loading mxrus files at runtime
If you’re using our Unity SDK to make a custom app launcher, you will need to detect when an environment has been deployed to the device’s configuration. When an environment is deployed, anEnvironmentFile would be made available in the runtime settings summary.
The EnvironmentFile class is defined as:
- This object can be accessed using
MXRManager.System.RuntimeSettingsSummary.customLauncherSettings.backgroundSettings.environmentFile MXRManager.System.OnRuntimeSettingsSummaryChangeis fired every time runtime settings summary is updated
EnvironmentFile class are:
idcan be used to uniquely identify an environment filepathis the sub path inside the ManageXR directory where the mxrus file is located
SceneLoader class in mxrus-sdk allows you to load mxrus files at runtime. Using the Load method, you can load the mxrus file into memory.
Here’s an example of a simple:
Built-in to URP gotchas
Changing your render pipeline from Built-In to URP may result in some materials turning pink if they’re using shaders incompatible with URP (for example the Stardard shader used in Built-In Render Pipeline) -> To fix, select the materials and click onUnity toolbar > Edit > Rendering > Materials > Convert Selected Built-in Materials to URP. Check if the material gets updated correctly. If not, resolve manually.